20 January 2010

Setting up DHCP over VPN on a Sonicwall

If you are using a Sonicwall Firewall, you may be interested in learning how to setup Virtual Private Network access to utilize network resources away from the workplace, assuming, of course, you've paid for the VPN licenses...

This post sprouts from an issue with Windows 7 64-bit and Sonicwall Global VPN Client 64-bit v4.2.6.0305 (the latest version as of the date of this post.) A client of mine had a strange issue where occasionally, the VPN connection would not work quite right. When connecting, he would see the following dialog box pop up:

(Please note: IP addresses and connection names have been hidden in the images.)

When researching the problem on the Internet, I noticed that this dialog box may sporadically appear when one of the following conditions are met: 1) The user is not connected to the Internet. 2) Internet Explorer has been uninstalled.

I was using GoToAssist when I saw this message, so he was obviously connected to the Internet. Additionally, IE was installed, and I even uninstalled and reinstalled it again just to make sure there weren't any changes to IE that would have caused the incident. To no avail, I continued onward in quest of solving this curious predicament.

First, I changed the connection settings to use LAN only to get rid of the dialog box.


After this, the connection was successfully established, but no data could pass through. I could not ping any host or access any service that resided on the remote network. I tried removing and reestablishing the connection, uninstalling and reinstalling the Global VPN Client, and even jumping up and down in frustration. None of these fixed the issue.

At first, I did not think there was any misconfiguration on the Sonicwall Firewall because four other people, one of which used Windows 7 32-bit, could successfully establish a connection and use network resources.

After contacting and working with the horrible Sonicwall technical support, I did finally come to a resolution. The virtual adapter settings for the VPN connection in the firewall were set to not lease any IP addresses via DHCP. Here is what we needed to have set up in order for the resolution to arise:

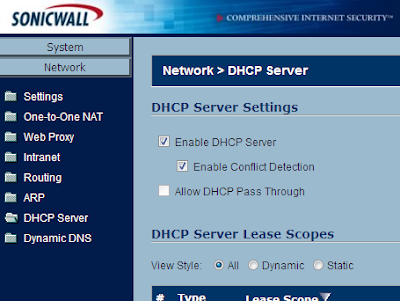
While it is not necessary for the Sonicwall Firewall to host the DHCP server, a DHCP server is probably required for this fix to work. To set up DHCP in a Sonicwall Firewall, navigate to Network -> DHCP Server. Select both Enable DHCP Server and Enable Conflict Detection. After that, create a DHCP Lease Scope under the appropriate heading. Apply the settings.

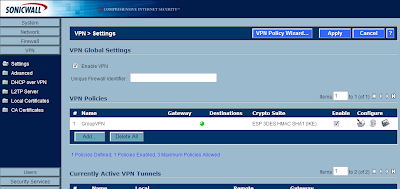
Next, under VPN -> Settings there should already be a GroupVPN policy. I believe this should be here by default. If it is not, you can use the VPN Policy Wizard to create a new one. Edit the GroupVPN policy by selecting the pencil+paper icon.

On the Client tab, under Client Connections, there is a drop down list for Virtual Adapter settings. Make sure DHCP Lease is selected. I had None selected at first, which Windows 7 64-bit doesn't cooperate with very well.


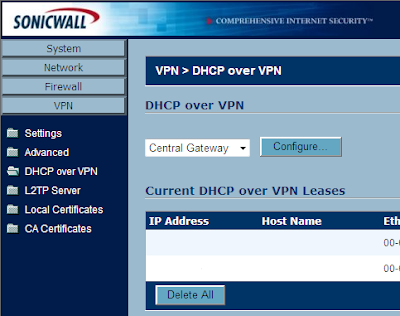
Next, go to VPN -> DHCP over VPN. You can view current leases from here. Go ahead and just select the Configure button.


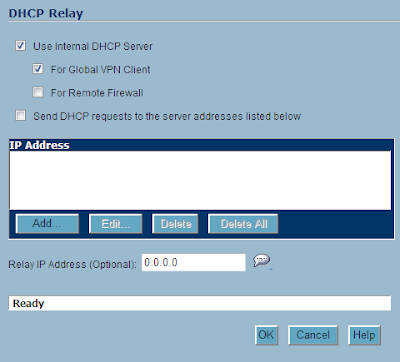
A new window opens. If you are using the internal Sonicwall DHCP server, ensure both Use Internal DHCP Server and For Global VPN Client are selected. If you are using a different DHCP server, instead check Send DHCP requests to the server addresses listed below. Add the appropriate DHCP server IP address. Hit OK.

That's it. This solved my problem. The Sonicwall technical support representative has no idea why the "None" option for the virtual network adapter did not work correctly, but the only operating system that had issues was Windows 7 64-bit.

Post any questions or comments.

Stay classy, fellow bloggers.

18 January 2010

Strange Time Zones Around the World

On my job, I work with people around the world. Many of these people live in India. India time, or IST, differs from much of the rest of the world in that it is off by thirty minutes, instead of an hour.

In 1884, the Greenwich Meridian was internationally recognized as zero degrees longitude at the International Meridian Conference, based on solar observations in Greenwich, England by Nevil Maskelyne. Over the next forty years, the world would supplant their local mean times with approximate differences rounded to hours or half hours "ahead of" or "behind" Greenwich Mean Time.

Greenwich Mean Time was considered deprecated as an accurate source of time variations globally in 1972 due to the inconsistency of the Earth's rotation. GMT was replaced with UTC, or Coordinated Universal Time, which is based on atomic clocks.

It is believed that India had two time zones and for the sake of unity, split the two down the middle to have one uniform time zone.

India is not the only country with a strange time zone, though. Afghanistan, Iran, Nepal, Sri Lanka, and Kabul also have strange time zones, differing by 15-30 minutes. Some states/provinces, like Newfoundland in Canada and South Australia have time zones different from the rest of their country. Saudi Arabia is even stranger yet. Apparently, the time is set on a daily basis, based on the sunset.

Read the Wikipedia article for more information on Greenwich Mean Time.

Stay classy, fellow bloggers.

17 January 2010

Setting Up a Gateway 840 with Windows Server 2003

After months of delay, I continued work on setting up a Gateway 840 SCSI to SATA RAID Storage Enclosure. This device is neither a SAN nor a NAS. It is just a box that holds SATA hard drives that is directly attached (DAS) to one or two servers via SCSI.

I knew virtually nothing about storage technologies when working on setting up this enclosure and will post the steps I took so others who know virtually nothing about storage technologies may benefit from it. :-)

Hardware Setup

Setting up this device is actually quite simple. I mounted it in the server rack, plugged in the power cable, connected the SCSI cable from the device to the server, and installed three 40 GB SATA HDDs in the front. Then I powered it up.

The Gateway 840 and Windows Server 2003

Windows Server 2003 automatically found and installed the appropriate driver for the storage enclosure. (Actually, the driver Windows installs is newer than any of the drivers available for download on Gateway's website.) I then downloaded and installed the StorView software.

StorView is a web-based application developed by Gateway that allows you to communicate with the storage enclosure. After installation, I selected the link from the Programs menu and the web application opened and found the Gateway device instantaneously.

The first course of action I took was to upgrade the controller firmware. I selected the Controller 0 link and a new window popped up. Under the Operations section, I selected the Update Firmware link. I selected the location of the firmware and away it went. It took just a minute for the controller to reset.

After upgrading the firmware, I selected the Create Array link. I selected all three drives, named the array, selected RAID level 0 (these drives aren't permanent anyway), and left the other settings at their defaults. After applying, the array began to initialize. I let the initialization process complete before continuing.

The next step was to create a Logical Drive, or a LUN. I selected the Create Logical Drive link and another window popped up. I selected the array from the left side of the window, named it, mapped it to 0, and made it available on both channels. Then I hit create.

The next step was to make the logical drive available to Windows. In order to do this, the server needed to be restarted so that the Adaptec SCSI adapter BIOS could locate the LUN. After the restart, the drive was visible in the Device Manager under hard disk drives.

Using the Logical Drive

I opened the Disk Management snap-in by right-clicking on My Computer and selecting Manage. Disk Management is beneath the Storage group. A wizard immediately popped up asking to initialize the new drive. I followed through the short wizard. Then, I right-clicked on the disk and selected the option to convert the basic disk to a dynamic disk. (There are many advantages to using dynamic disks over basic disks.) Then, I right-clicked the partition area and created a new partition. I formatted it as NTFS and assigned it a drive letter.

Oooo, I feel accomplished and fuzzy.

Post any questions or comments.

Stay classy, fellow bloggers.

16 January 2010

Wireless Workgroup Bridges

Not too long ago, I gave my brother a decent Pentium 4 Dell PC. Now that I brought him a monitor, keyboard, and mouse, he decided he wants to use it to run an IRC server. There is a bit of a hiccup, however. The PC can only connect to the network via wired Ethernet. There are not any Ethernet jacks in his room. He already has two laptops; one laptop cannot connect to the Wireless LAN so his other laptop acts as a router between it and the network.

We thought of a number of solutions for this predicament:
  1. Buy another set of power line Ethernet adapters (~$100)
  2. Run Ethernet cabling up two stories (A big pain in the ass)
  3. Buy a switch and continue to use the laptop with WLAN connectivity as the router (~$30)
  4. Buy a wireless PCI adapter for the PC (~$50)
  5. Think of something innovative
Since we didn't want to spend any money, options one, three, and four were out of the question. Additionally, because he is hosting a server, options three and four are not smart choices because they are unreliable.

The only option we had was number five: Think of something innovative. So I did.

I wondered about our options regarding connecting a switch to the network from his room. The only real option we had without running cabling or purchasing expensive power line Ethernet adapters was wireless. I found a Cisco Aironet 1200 series wireless access point laying around (I hadn't yet used it because I did not have any antennae). I currently have a Cisco Aironet 1200 series wireless access point set up now to serve my house wireless connectivity over 802.11b. There was also a Linksys WRT54GL router lying around still in its box. Don't ask me where it came from.

I put two and two together and came up with the idea to create a wireless bridge between both Cisco Aironet access points and to use the router to bring all of his devices together in his own network. To save everyone who is in a similar situation time and energy, I will describe the steps I undertook and the problems I encountered while accomplishing this.

Concept

The idea was to create an island of devices that would connect to the network across a wireless bridge. Here is an image to illustrate:


Setting up the new Wireless Access Point

To start, I wanted to make sure that I had a factory-fresh WAP. I held down the mode button and plugged in the power cable. The middle LED light on the top of the WAP turned amber in color, and then I released the mode button. This ensured that all the settings were in their default states.

I proceeded to connect my brother's laptop to the WAP with an Ethernet cable so that I could configure the device. Cisco Aironet 1200 series Wireless Access Points will have all of their wireless radios turned off by default and will only be configurable via Ethernet cable or console cable. I decided the GUI method via Ethernet cable was the easiest route to take to configure the WAP. Depending on the model of the Cisco Aironet 1200 series WAP, the device will either be preconfigured with a static IP 10.0.0.1/8 or automatically get IP information via DHCP.

I continued to configure the device by statically setting my brother's Ethernet adapter with IP address 10.0.0.2/8. I pointed Google Chrome to the WAP and logged in using the default credentials:
  • Username: Cisco
  • Password: Cisco
I therein discovered that this WAP had an 802.11g adapter in it, which is far better than my existing 802.11b WAP. I decided I would swap them.

After logging in, I went to Security -> Admin Access -> Local User List and created a new read/write user for myself. After, I deleted the old user. I also changed the default authentication password. Now that I had relogged in, I went to Express Set-Up. I picked a system name, entered my chosen SSID, and selected Apply. I then went to Network Interfaces -> Radio0-802.11G -> Settings. I enabled the radio and ensured that the role was set to Access Point Root. Down the page, there is an option to enable Reliable Multicast to WGB. Make sure this is enabled. Per Cisco, this option will treat the WAP on the isolated network as an infrastructure device to ensure multicast integrity. After this, hitting apply put everything into effect. The radio, though enabled, will still appear to be disabled. This is because the SSID still needs to be configured. I selected Security -> SSID Manager. Here I created my SSID and selected the encryption options. After hitting Apply, there was just one more option I needed to configure. I went back to the Express Set-Up page and changed the Configuration Server Protocol to DHCP. This is because I created a DHCP reservation for this device's MAC address for management purposes. After this change, the device was inaccessible to me. I swapped it out with the 802.11b WAP and tested. It worked. :-)

Setting up the old Wireless Access Point

Now that I configured the 802.11g WAP as the Access Point Root, it was time to setup the wireless bridge. I ran into quite a few problems with this one. Firstly, I set the WAP to factory defaults. Then I had problems trying to get into the management page. The reason for this was because the device is configured for DHCP by default. So, I connected it to the network and looked up its IP address in my DHCP server's client list. I was able to successfully log in and change the admin account settings and the hostname. I did have a problem configuring the role for the device as a Workgroup Bridge. Every time I tried to select the option, it wouldn't stick. I could actually only select three of the five roles on this page. I was able to get around this by telnetting into the device (telnet is enabled by default) and running the following commands:


# enable
# configure
(config)# interface dot11radio 0
(config-if)# station-role wgb


The GUI then showed the option selected. I enabled the radio and added the SSID with the same name and encryption settings. (The SSID must be exactly the same on both Wireless Access Points for the Workgroup Bridge to work.) As soon as I hit apply, the device became inaccessible to me. The radio turned on and the WAP was all good to go. There was only one step left.

Setting up the Linksys WRT54GL

This was the easiest part. I connected the router to my brother's laptop with an Ethernet cable. I statically set his Ethernet adapter to IP address 192.168.0.2/24. The default IP address for the Linksys router is 192.168.0.1/24. I used the default credentials to login:
  • Username: admin
  • Password: 1234
After changing the default password, I turned off the radio, as it was unneeded. I also disabled the firewall on the device because it is unneeded on the trusted network. I set the WAN settings statically to match my network and configured the DHCP settings to lease IPs on a less popular subnet (in case he ever tries to create a tunnel to an outside network, the subnets are unlikely to match). I changed the device mode from Gateway to Router in order to setup the static routes. (Both my Juniper Firewall, which serves as my network's default gateway, and the Linksys Router support RIP, however I noticed that the routes were never dynamically added over a substantial amount of time, so I created them statically on both devices). Be sure to remember that the network will be accessed across the WAN interface on the Linksys router.

Putting together the pieces

After having configured both wireless access points and the router, we plugged everything in. The PC connected to the built-in switch in the router and the router's Internet port connected to the WAP's Ethernet port. We tested connectivity between the networks from both ends without any issues. It worked right away.

Though we could have found simpler solutions with little investment to connect my brother's PC to the network, we learned quite a bit about wireless workgroup bridges, routing, and networking while having a lot of fun!

Post your ideas, comments, suggestions, and questions as a comment if you'd like!

Stay classy, fellow bloggers.